Bewitching Halloween Eggs
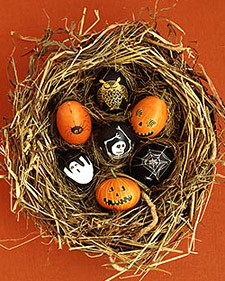
Decorating Supplies You can find the specialized items pictured above at some crafts stores, or order them online (to find sites that sell them, type "Ukrainian Easter eggs" into a search engine). Ear syringe (1) Use this item, available at drugstores, to squeeze air into an egg and expel its contents. Blown-out eggs (2) Brown yields a rich color when dyed; white is best for making ghosts and skeletons. Utility knife (3) The sharp point will allow you to make small holes in the shell, through which the egg can be pushed out. Pure or black beeswax (4) Wax is used to create designs on the egg. You can use either kind: Pure beeswax is softer and more pliable; black beeswax is easier to see. Kistkas (5) These writing tools are plastic sticks with brass barrels; melted wax drips through a small hole in the barrel onto the egg. There are three types: A white kistka makes the thinnest line; blue, a medium-size line; and red, the thickest line. Powder dyes (6) Add hot water to these special powders to create an intensely colored dye that will stay vivid for years on a decorated egg. Candles (7) The flame on a taper candle will melt the wax when you're done. Cotton swabs (8) Use to apply dye to small areas. Tongs (9) Easy-to-handle tongs are ideal for holding eggs while you dip them in dye. Craft glue (10) Use glue for affixing embellishments, such as stems and ornament hooks, to a finished egg. Eye screws (11) Glue one in the top hole of an egg; then thread ribbon through it for egg ornaments. Pipe cleaners (12) These can be used to create pumpkin stems. Floral tape (13) Green tape can be wrapped around pipe cleaners to reinforce stems. Tips Emptying Eggs Lightly pierce both ends with a utility knife; spin it to enlarge the hole a bit. Poke a wire through to pierce the yolk. Hold the egg, narrow side down, over a bowl. Blow out its contents with a syringe. Layering Colors When working with more than one dye, you should always start with the lightest hue and progress to the darkest. It's a good idea to plan the wax-dye sequence ahead of time, keeping in mind that each section that is not covered with wax will turn the shade of the next color you use. Two-Color Eggs The section of the egg you cover with wax will end up the color of the shell (or you can dye the egg first, and the section you cover with wax will end up being that color). The remainder of the shell will be the color that you use after applying wax. Before you begin, put on old clothes and cover your work surface with newspaper. Following the instructions on the dye, make a batch in a clean glass jar; leave uncovered. Don't close the jar until the liquid has cooled to room temperature. Make an egg-drying board: Insert toothpicks in a grid shape on a piece of foam board. Blow out eggs; gently rinse the eggshell and let dry. 1. Plug the holes in a blown-out egg with beeswax: Heat the barrel of a blue kistka in a flame for about 20 seconds, then scoop wax into the barrel until almost full (if it doesn't melt, heat the barrel again). Touch the tip of the kistka to a hole; a bead of wax will run out and seal it. Repeat with other end. 2. Before creating a wax design, do a practice sketch on paper (or download our templates). To decorate the egg, draw the outlines of the image and features with wax, touching the tip to the shell and heating and refilling it as necessary. Next, fill in the outline with wax, leaving details (such as the mouth and pupils) white; let dry. To remove finger oils (so the dye will adhere), use tongs to dip the egg in a mixture of 1/4 cup vinegar and 1 cup water. Remove the egg when bubbles begin to form on the shell, about 1 minute. 3. With tongs, dip the egg in dye for about 1 minute. Rest the dyed egg on the toothpicks of the drying board. Let dry, about 5 minutes; dip the egg in dye again if you want a darker color. 4. Melt all the wax off the shell: Hold the shell next to the flame (not in it); turn the egg and blot it with a paper towel as the wax melts off. Continue, using fresh paper towels as needed. Three-Color Eggs With three colors, you will layer wax and dye, a process in which some parts are sealed with wax to resist the next color. Here, we tell you how to make an orange pumpkin with yellow stripes and black features; adapt the instructions for any three-color design (for the color white, begin by leaving the egg bare). As described on the previous page, make your dyes, blow out the eggs, and seal the holes with wax. Dip an egg in a vinegar bath to remove finger oils; then dye it, starting with the lightest of the three colors (for the pumpkin, begin with yellow dye). Let dry. 1. The pumpkin-face outlines and "ribs" will stay yellow: With the heated blue kistka, scoop out the wax and "draw" the outline of the pumpkin features. For pumpkin ribs, divide the egg in half with a circle of wax, skipping facial features; draw another to divide it in fourths, then two more to divide it in eighths. 2. With tongs, dip the egg in orange dye until it reaches the desired hue; let it dry on the foam board. 3. Use wax to fill in the space surrounding the features that you wish to be black: the eyes, nose, and mouth. 4. Dip a cotton swab into black dye; use it to fill in the eyes, nose, and mouth. Let the egg dry on the rack. Next, hold the shell next to the flame (not in it) to melt the wax, blotting the shell with a paper towel. 5. To make a pumpkin stem, snip off a piece of green pipe cleaner about 1/2 inch long. Wrap half with green floral tape; push the other end into the top egg hole. If the pipe cleaner is too thick for the hole, trim the fuzz with scissors. Then add a dab of glue to the hole, and insert the pipe cleaner; let dry. Source: http://forums.marthastewart.com/
Read full story
Related Posts